September 23, 2013

Halloween Party Food Ideas...The Blood Bar

If you hadn't gathered by now I LOVE Halloween! I had this party nearly 3 years ago but for some reason never blogged about it. My guests LOVED this and so lets get this out in blog land. 

For the refreshments I had a "Blood Bar" aka a fondue bar. 


Here's what I did. For the "blood" I melted white chocolate and added red food coloring. You can get red melting chocolate now at Micheal's Craft store. I kept in warming in a crock pot. Then we had these items to dip. 

Heart=fresh strawberries 

Brain=pound cake cut into squares 

Bones=long pretzels 

We also had oreos, cookies and marshmallows. I ran out of time to come up with clever names. I suppose the marshmallows could be baby ghosts :)
This was a pretty last minute party and if I tried I could have gotten way more creative. It was delicious and fun to get in the spooky mood. I also had popcorn in mini bags for guests to take.


I also filled a plastic glove full of water I tinted green with good coloring and froze a few of them. This became my ice for the punch. I didn't get a picture before it melted but a spider ring on the finger gave it that spooky touch. When the fingers melted I just rested the spider on top of the remaining ice. 


I would love to do these for a party too. How yummy do these look?


Mini caramel apples. Just use a melon baller and dip. Love this!!


I decorated the house a little differently then I would now but here is what it looked like. I have more Halloween decor ideas coming in my next post too. So come on back!


I'm getting so excited for Halloween, for the cooler days, the pumpkin and spice EVERYTHING. The scary movies and just everything about Fall. I saw this photo on Pinterest and it cracked me up. I'm sure y'all can appreciate it. 


Get spookifying your house. It's worth the extra effort to have a fun Halloween.

xo Emily xo


September 19, 2013

Faux Fall Mantle

It's my favorite time of year and I could not wait to start decorating for fall. I have 2 "mantles" this year after creating a faux mantle in my entry way. I have an old piece of my pioneer grandmother's farm table and that became my mantle after hanging two corbels on the wall and simply setting the farm table piece on top. An old window from a South Carolina mansion, hung slightly above created the perfect balance for my faux mantle. Here is the final result after making a few of the items and I'll tell you how to do it in this post. 


I am going to say this is my favorite holiday decoration I have done thus far in my 35 years. I will be going to Salem, Mass in a few weeks to visit a couple of dear friends and witches are always a favorite Halloween subject. So, I ran with a classy witch theme. 


For the bunting I cut 5 inch pieces of this beautiful upholstery strapping. Notched out a triangle at one end and then simply glue gunned it onto a piece of twine. How simple? Very!


I wanted some spider webs but didn't have time to get to the store and I wanted it finished that day. I came up with the crazy idea of making webs with my hot glue gun. It worked! Here's how I did it. 

Hot Glue Spider Webs

You'll need:

An old cookie sheet
Pam or oil to grease the pan
A hot glue gun
5-6 large glue sticks
Black paint 

First, grease your old pan so they peel off when dry. Then create 3-4 lines in a fan pattern. Then go back in and join the lines by letting the glue swag between each line. 


Make a few different sizes. I knew the window I wanted them in so I just went with that approximate sizing. I never measured just eyeballed it. Once they are cool, peel them off and place them on an old box or newspaper where you can spray paint or lightly brush them with paint. 


Once that is all dry use sticky tack to hang where you would like. My gorgeous sister in law suggested putting black glitter on them which would look fabulous too. Sadly, I didn't have any on hand.


Here was what I had after gathering things and styling it. It needed something else. So, as you do, I whipped up a witch silhouette. Here's what I did. 

Witch Silhouette 

You'll need:

1 pre-cut log slice
Fabric or ribbon of your choice
A pencil 
Hot glue gun
Template of witch or free hand it
Black paint 

Here is a template of a witch but I free hand drew mine. I wanted more of a pronounced nose and scary look but this template is adorable. 


You basically transfer or draw on your witch outline then fill in with black paint. Couldn't be simpler. To hang it I cut a long piece of black ticking fabric, frayed the edges and tied a bow in the middle. I then secured the bow knot with hot glue so it would hang securely. Then I hot glued the ribbon to the back of the wood slice. Voila! An adorable witch silhouette for years and years of decorating to come. I will be making a few of these to sell if you don't want to make them yourselves. Just email me leylands @ gmail .com if you would like one. 


She turned out beautifully! And she completed my witch faux mantle just perfectly. It was the finishing touch, the crown jewel. 


I hope this inspires you to create something today. Get adventurous and try something new. The last little detail I made some years ago is my "Spell Book"

I took an old book that was in dreadful condition and had the spine coming away from the cover. I helped it come away completely and wrote on it with a sharpie. Cool huh?


I'm in love with my Faux Fall Mantle and I hope you are too. 

xo Emily xo


September 11, 2013

Heal Your Heart With Autumnal Art

Today is September the 11th. A day that will forever be etched in our minds. A tragic day that will always choke you up as you remember where you were when the towers fell. Where you were when the planes crashed and when the reality of what was going on, truly sank in. I am trying not to dwell on the sadness today but instead trying to think of hope, of overcoming and conquering. We are Americans and our spirit can never be dimmed. 

I came across this quote awhile ago and I had never heard it. It resonated with me on so many levels. 


Art has the ability to stir your heart. To escape if needs be. 


As we are dealing with the heaviness of today, let us keep living for those who can not. Let us be better to one another, be kinder, go a little further then we normally would to help someone. We have Autumn days to get excited for and so many memories to make. Let us keep fighting for our freedoms in all respects. I hope  these beautiful works of art remind you of the ability that art has to comfort the soul. There are better days ahead and so much to be thankful for. 

"Fall" by Olivia Mae Pendergast

Urban Street Art

The Undergrowth in the Forest of Saint-Germain. Claude Monet 1882

"Sun Spill" by Bella Gingelli

"Lazy Autumn" by Maynard Dixon

by Alphonse Mucha 1898

 Vincent Van Gogh 1890

"Autumn in Orillia" by Franklin Carmichael 1924

"Peace in October" by Maynard Dixon 1943

(You'll be hearing a lot more about one of my favorite artists, Maynard Dixon soon)


Hopefully you have washed away a little of the dust from today. If not, go create art in any way that you can.

xo Emily xo


September 10, 2013

Awwwww shucks...kind of a corny tip.

Fresh corn on the cob season is quickly winding down in most parts of the country, but we are still trying to make the most of the bounty of fresh corn that is still growing around us here in Indiana.


It's a favorite snack in our home and fortunately, I learned a great time saving trick this year. Do you want to know what it is? Of course you do!! Here's the trick. It's pretty simple. Ready?

DO NOT SHUCK THE CORN BEFORE COOKING. 
That's it!!

The husks are the perfect thing to cook your corn in. If you want one or two pieces at a time then just throw one piece (husks and all) in the microwave for 2 minutes, voila! It steams it perfectly! 

For more than 1-2 pieces simply crank up your oven to 400 degrees, throw in the corn (husks and all) on the oven rack for 20 minutes. That's it!!


Take them out with an oven glove or tongs and wait a minute or two for it to cool down a bit. At the top of the corn where the silk is, divide in 2 and pull apart. In one swoop the silk and husks come off easily. Pop off at the bottom and voila! No more boiling the heck out of your corn and having a soggy mess on your plate. Seriously, this tip is life changing and you're welcome ;)


Give it a try! You'll be so glad you did! 
One more tip. Buy some Spike. This is a salt free seasoning that will also change your life. It's sooo delicious. I grew up putting Spike on everything from fresh tomatoes, to meats, any kind of veggies and absolutely, hands down, the best thing to put it on is corn. The taste of it brings me back to summer evenings with my grandma, eating fresh corn that the Reese family of Mount Carmel, Utah lovingly grew. Nostalgia in a jar, can't beat it! Get some, you won't be sorry! 


xo Emily xo

September 07, 2013

It's Fall Y'all

Technically, it's not fall yet, but it's September and that's enough for me to get my decorating on. I've started to put a few pumpkins out and some are resting on top of my favorite makeover project of late. I spent hours on this little beaut!


It was not pretty before. Here it is among a few of the other projects I'm working on. I will have the reveals of those soon. 


I painted, distressed, waxed and adorned this beauty with numbers and new hardware. Sadly, I don't get to keep this. It's on it's way to a new home. I'm kicking myself for selling it because I LOVE it!!! 


Go treasure hunting this weekend for some great pieces to breath new life into. 

 I have some great Halloween projects coming up and lots of catching up to do. I am more than excited that we are nearing October and all of the wonderful treats that month brings.

Have a wonderful weekend everyone! 

xo Emily xo 


September 05, 2013

Green Goddess


Here's a quick and easy way to insert some nutrition into your day, or stick to your weight loss goals. This smoothie is a daily treat for me. It's packed full of goodness for this Goddess! 

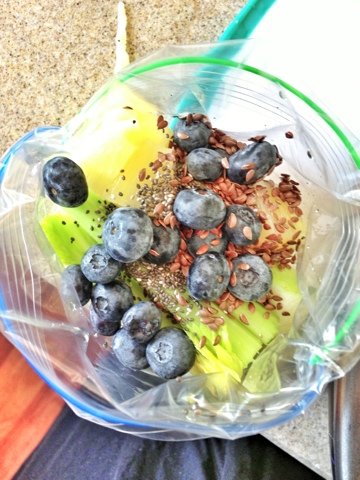
Rather than cutting and chopping everything each day as I want to indulge in one, I take about 20 minutes each week to cut, chop, slice and pour everything at once and freeze. When I am in a hurry and need a quick meal or snack, I can simply pop into the freezer and take the baggie out and blend. This can be the entire smoothie itself which is quite delicious, or it can be a base that you add upon. Add more fruits, protein powder, Greek yogurt for protein, etc. 


So- here is my recipe but you can't really go wrong adding whatever you want. Stick to one stalk of celery unless you want it more bitter.

            GREEN GODDESS SMOOTHIE

1 green apple
1 celery stalk 
1 cup of spinach or kale
1/4 cup of blueberries 
1/2 cup of pineapple (fresh or canned) 
1 tbsp flax seeds
1 tbsp chia seeds
1 tbsp hemp oil 

Place those ingredients into a baggie and freeze. When ready rip apart the baggie and place into a blender. At this point you can add almond milk, water, juice or some yogurt to emulsify the smoothie. Blend and enjoy. 


You may be asking yourself "what in the world is hemp oil."  It's a cold pressed oil from hemp seeds that is quickly growing in popularity because of the health benefits. It has a slightly nutty taste and is a gorgeous bright green color. We use it on salads, marinades and obviously smoothies. It's rich in Omega 3's and go here to find out more.


For me in this crazy, fast paced life we are in, this is a quick and easy way to provide nutritious snacks for my family. My kids adore these smoothies and as a mom, that helps ease my conscious if sometimes I can get them a healthy alternative to all the junk food out there. Go make these, prep once and save yourself lots of time. 

                xo Emily xo